Several years ago, Instagram has allowed users to publish 10 photos at the same time in the form of an album in one post. This small change has led to creations, one of which is the panoramic images on Instagram, which are created by dividing a photo. It can be easily done in two parts.
How to post panorama photos on Instagram
If you want to publish a panoramic photo on Instagram in such a way that the full photo is shown by swiping left and right, you can do it in two ways that are explained below.
The first method: using the InSwipe application
If you are not very interested in working with Photoshop and want to simply publish a panoramic photo on Instagram, the solution is to use special applications. InSwipe is one of these good applications for Android that will give you this It allows you to publish 10 photos as a panorama on Instagram. The advantage of this program is that it does not add a watermark to your photos. But for iOS, you can use the Swipeable program.
Almost all existing image editors can be used to cut photos into pieces. But if you do it once, you will realize that it is time-consuming.
But fortunately, there are relatively good apps that can be used to achieve such a possibility directly. Of course, it should be noted that some of these categories of apps are not as defined as you think and the result of their work may not be acceptable.
However, among these apps, InSwipe is one of the best. You can use it to convert the images into 10 different pieces and finally publish your panoramic image by putting them together on Instagram.
In addition, InSwipe does not add watermarks to photos and the beauty of your images is preserved with its help. However, choosing a good app for iOS is a bit difficult. Maybe the Swipeable app is a good option. It does not put a watermark on the images and does not reduce the beauty of the photos.
But the problem is that you can’t choose the number of photo parts by it. Of course, Swipeable is not the only one, and with the help of Unsquared, you can also prepare panoramic photos for publishing on Instagram. With Unsquared, you can divide photos into as many pieces as you want.
However, you have to watch the promotional video for each photo to remove the Unsquared watermark. So if you are an iOS user and you know a better app related to this issue, share it with us.
Fortunately, the way of working with all these apps is almost the same, and by introducing one of them, you can also explain the features and details of others. For this purpose, we will describe how to work with InSwipe.
After downloading and running the app, touch the “Gallery” button. Then select your desired photo through Gallery and enter the editor. Now specify the number of parts you want your image to be divided into.
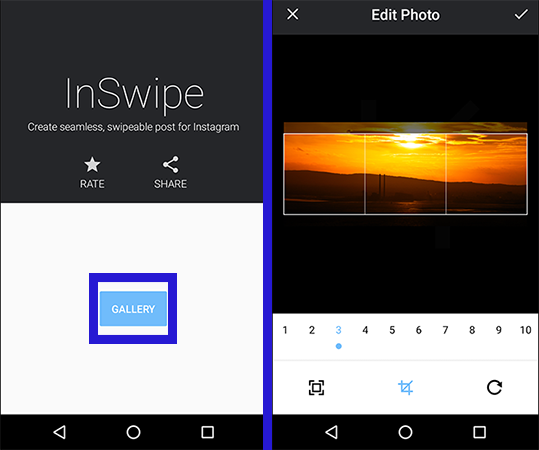
To remove the InSwipe watermark, just touch the photo you are editing several times. After completing the steps, save the photos and enter Instagram.
Then enter the page related to the publication of the post on Instagram and select the option to create a new album. Now place the photos in order from left to right in the Instagram editor. After completing these steps, you are done and you can post your panorama image on Instagram.
The second method: using Photoshop
If you want to publish professional images and have a little knowledge of Photoshop, this method is suitable for you. To get started, you need two things, first, a pixel-based photo editing program that allows you to work with layers work, the most prominent of which is the Adobe Photoshop program, and the second is a basic understanding of Instagram conditions for the size of photos.
Regarding the size of the images, it doesn’t matter which photo you upload because Instagram will automatically resize and compress your images.
For example, square photos are always published in dimensions of 1080×1080, and vertical photos with a width of 1080 pixels and a length of 1350 pixels. Therefore, if you want to have a panorama of two vertical photos, you must divide the pixels lengthwise. For example, to get two 1080×1350 photos, you need one 2160×1350 pixel image. Well, let’s create our panorama:
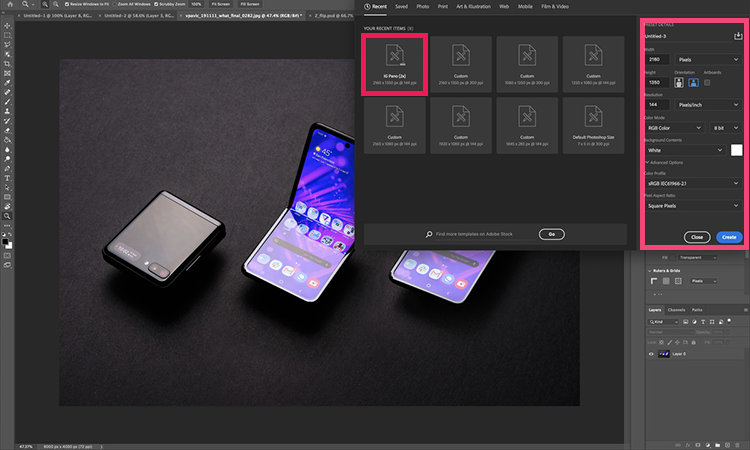
First, enter Photoshop and open two documents. The first document should be 1350*2160 in size so that we can divide our full image into two pictures here. Name this document “Full Image“.
In Photoshop, you can save the document size as a default for future edits.
The second document should be 1080×1350 pixels, here you should drop each of the photos and prepare them for extraction. You can name this document “Slices”.
- Now insert your complete image in the first document.
- Go to the “View” section from the menu bar and select the “New Guide Layout” option.
- In this window, enter the number 2 for “columns“. We don’t need to enter rows, so remove the “rows” option to disable it. Now you can see a turquoise cut line in the middle of the photo.
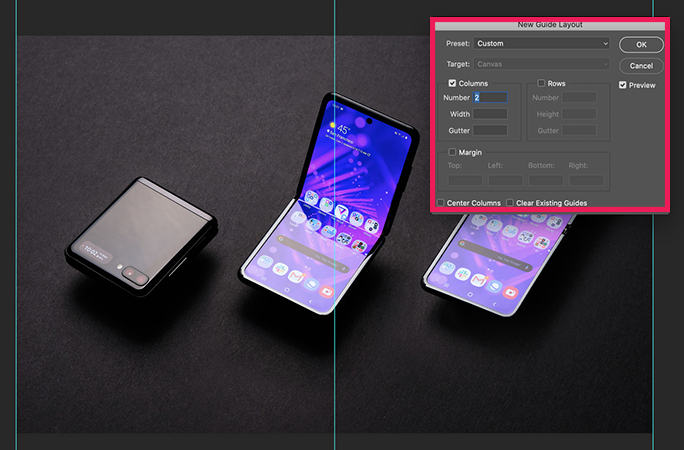
- Before you go to the next step, make sure that “Snap to Guide” is turned on. This will make your work easier.
- Select the “Marquee” tool on your left (or press the “M” shortcut) and drag the pointer over the first half of the photo. If “Snap To Guide” is turned on, your selection will automatically turn into a vertical turquoise line. that you have already created will stick.
- Now that you have made your selection, you can simply copy and paste it into the second document called “Slices” that you created earlier.
- Go back to the first document “Full Image” and copy and paste the second half of the photo into it.
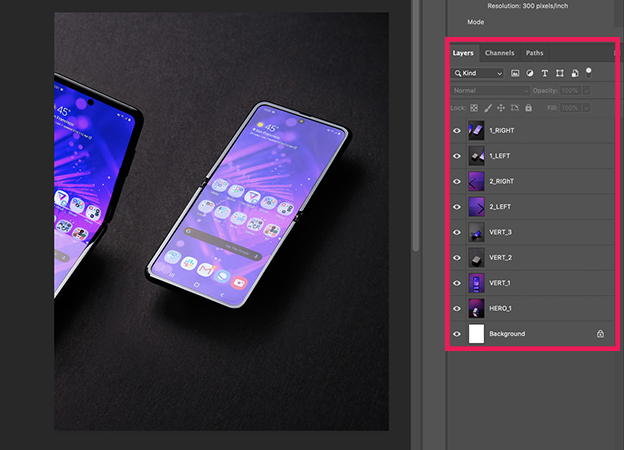
Now your images are ready for export. You can export each layer simultaneously or separately using the “Layers to Files” option under the “Export” section in “File“.
The easiest way to save your files is to use a cloud service, where you can easily access them with your phone. Or if you’re in the macOS / iOS ecosystem, export as easily as Airdrop.
Upload panoramic images on Instagram
Now, to send the prepared images, log in to Instagram and by tapping on the option on the left, first make sure that you want to upload vertical photos. So don’t forget to activate this option.
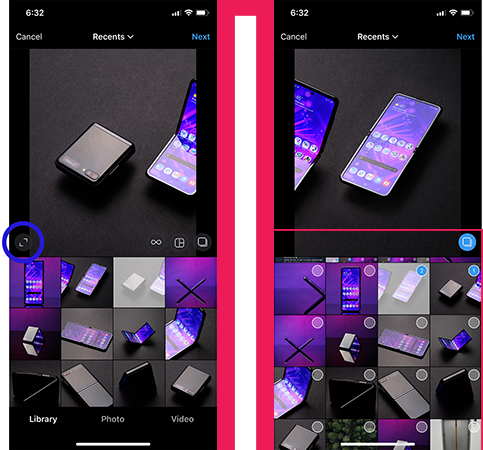
Now select the two prepared photos. To do this, hold your finger on one photo or use the option to select multiple photos. And finally, make sure that you have selected the photos in the correct order because it is possible to Select the second photo first.
Frequently asked questions about How to post panorama photos on Instagram
- What is a panorama photo and how is it different from a regular photo?
A panorama photo is a wide, elongated image created by stitching multiple photos together to capture a larger field of view than a single photo can capture. It’s different from a regular photo in terms of its aspect ratio and width.
- Can I post panoramic photos on Instagram?
Yes, you can post panoramic photos on Instagram. However, the platform has specific size restrictions for photos, so make sure your panoramic photo fits within these guidelines before uploading.
- What is the ideal size for a panoramic photo on Instagram?
The ideal size for a panoramic photo on Instagram is 1080 pixels wide by 566 pixels tall. However, the platform allows photos up to a maximum of 1080 pixels wide by 1350 pixels tall.
- How to post panorama photos on Instagram?
You can upload a panoramic photo to Instagram just like you would upload any other photo. Simply select the photo from your camera roll, crop it to fit within the size restrictions, and hit the “Share” button to post it to your Instagram account. You can also use third-party photo editing apps to optimize your panoramic photo for the platform before uploading.
In this article, we talked about “How to post panorama photos on Instagram” and we are waiting for your experiences to use these methods. Please share your thoughts with us.