“Finder” has been chosen by Apple as the file management tool in MacOS. At first glance, this application looks similar to many other available titles for navigating through content; But using some tricks when using it can increase the productivity of users.
How to organize files on Mac
The appearance of most file management tools, including Finder and Windows Explorer, are very similar to each other; But Apple has hidden several useful functions under the beautiful skin of its product. Knowing the tips related to the Finder application will make users a better experience when using the operating system and get to know the real potential of the Mac.
1. Create a new folder with the selected files
Suppose you want to move a large number of images or documents to a new folder. Normally, you would first create a new folder and then drag and drop files into it. Although the said method seems very basic and simple, in some cases it may take a lot of time from the user. Alternatively, you will be able to select multiple files and define a new folder for all of them to automatically move to the specified location.
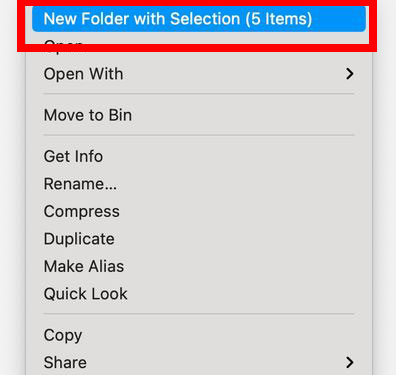
To perform the said process, first, select the desired files and then click the “+” control on them or go to the “File” menu. Now click on the “New Folder with Selection” option. Enter your desired name for the new folder and finally press the “Enter” key. Now the selected files will be moved to the new folder.
2. Moving files in Finder (Cut)
Although copying files in the Finder software is easy; Permanently moving or cutting files is not very similar to Windows Explorer. Fortunately, doing this only requires knowing the order of pressing a few keys. To start, first, select the desired file. Then use the combination key “Cmd + C” to copy the file. This can also be done by going to the “Edit” menu and selecting the “Copy” option.
Next, use the combination key “Cmd + Option + V” to move the file to the destination. By selecting the Edit menu, you can also click on “Option” and then select the “Move Items here” option. As you can see, the Finder doesn’t use a command called “Cut“, but the “Move” option provides exactly the same functionality as Cut in Windows.
3. Batch rename multiple files
You may sometimes find the need to batch rename multiple files. In the old and simple method, the names of all files are changed individually; But in most cases, changing the group name can be more useful. Users can use this feature to replace names, add new words to them, and optimize for specific formats.
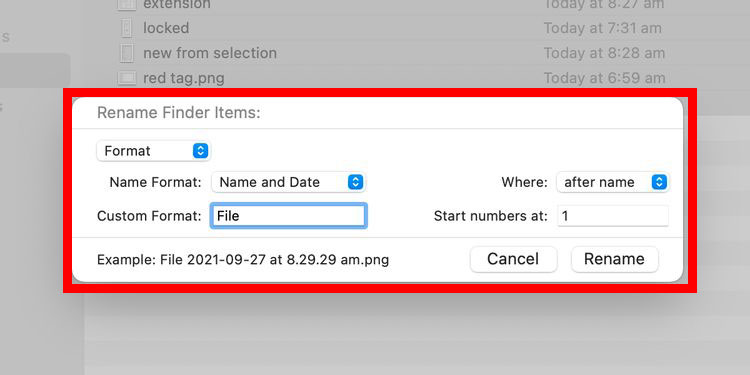
To rename a group of files in Finder, first, select all the desired items. Then Control + click on the selected files or go to the “File” menu. Next, select the “Rename” option. Now you have to choose the type of function you want. “Replace Text” is for replacing the entire file name, while “Add Text” only adds a part to the name. The “Format” option is also available to optimize the names. Next, enter the requested items and finally click on the “Rename” button.
4. Change icons of files and folders
Changing the icons of files or folders can be a good way to distinguish a particular item and draw more attention to it. Also, such work will reduce the confusion between multiple folders and reduce the possibility of making an error in choosing the right folder or file. The process of changing icons in the Finder software is relatively simple and easy.
Tagging by colors helps the user easily find the desired files in mass lists.
First, copy the desired icon or image to the clipboard. Then select the file or folder you want to change its icon. Control “+” Click on the selected item or refer to the “File” menu. Select the “Get Info” option and then click on the icon displayed in the corresponding window. Now press the key combination “Cmd + V” to paste the copied image. You can also select “Paste” from the “Edit” menu. First, copy the desired icon or image to the clipboard. Then select the file or folder you want to change its icon. Click the “+” control on the selected item or refer to the “File” menu. Select the “Get Info” option and then click on the icon displayed in the corresponding window. Now press the key combination “Cmd + V” to paste the copied image. You can also select “Paste” from the “Edit” menu.
Now the desired file or folder icon will change to a new image. Note that when using an image, you must first open it and then copy it to the clipboard. Such work will not be required for special icon files.
5. Marking files using color tags
Tagging is an interesting tool for easier identification of files, which can be done in different ways. Tagging by colors helps the user easily find the desired files in mass lists. Also, the Finder software system is able to identify tags separately and provides the user with the ability to search among files with similar tags.
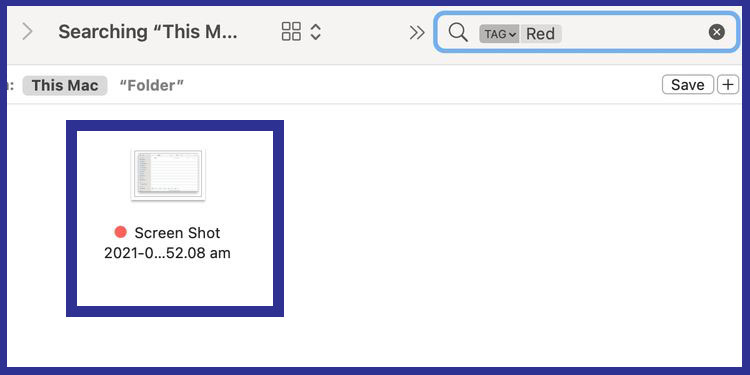
To start the tagging process, first, select the files that are similar to each other and click control “+” on them. Next, click on “File” or use the dedicated “Edit Tags icon” option on the Finder toolbar. Now select your desired tag for the selected files. To navigate the tagged files, you can enter the desired tag name (for example, red or blue) in the search bar and then choose from the suggested options.
6. Creating smart folders
The Smart Folder feature in the Mac operating system can be a very useful option for automatic file management. For example, by changing the relevant parameters, you can automatically transfer all the files with the “PNG” format that has the word “screenshot” in their name to a specific folder. Also, when you add new files to your system, the Finder program can organize them automatically.
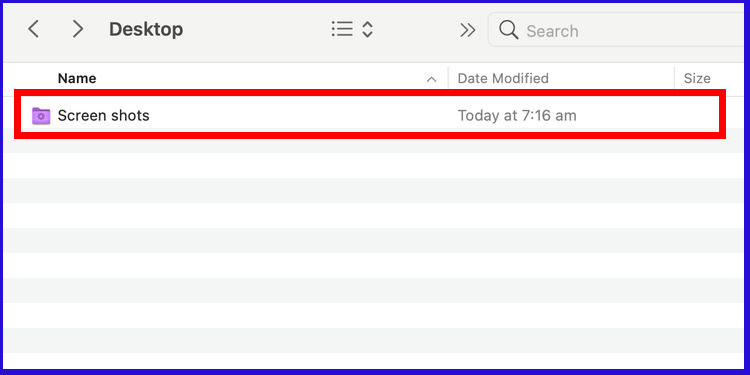
To use the smart folder feature, first, go to the “File” menu in the Finder and then click on the “New Smart Folder” option. Next, enter your desired parameters in the “Search” window and select the desired variables. Finally, click on the “Save” button and define the name and location of the folder. Finally, press the “Save” key again. The high potential of the smart folder feature has made it a suitable option for defining various automation in the Finder. Its performance also depends on the complexity of the parameters considered by the user.
7. Lock folders
Locking folders comes in handy when using shared devices with other people. Also, if you want to prevent accidental deletion of a folder, locking is a very safe method. An admin password will be required to remove or add items and make changes to a locked folder.
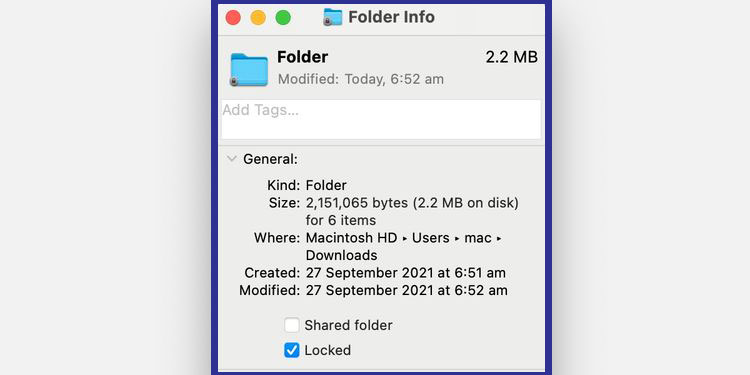
To lock a folder, after selecting it, use the “+” control or refer to the “File” menu. Then select the option “Get Info” and tick the word “Locked” in the “Info” window. To unlock the folder, just remove the said tick.
8. Compress files
When sending multiple large files as attachments by various means, including email, using zip archives seems to be a more logical option.
The compression tool has many uses in the Mac operating system. Its primary advantage is reducing the size of files that are stored in ZIP format archives. You can also use this tool to quickly merge multiple files together. For example, when sending multiple large files as attachments with different tools, including email, using zip archives seems to be a more logical option.
To create a zip archive, first, select the desired files and then control “+” click on them or go to the File menu. Finally, select the “Compress” option. The created archive file will have the same folder name and only have a different format.
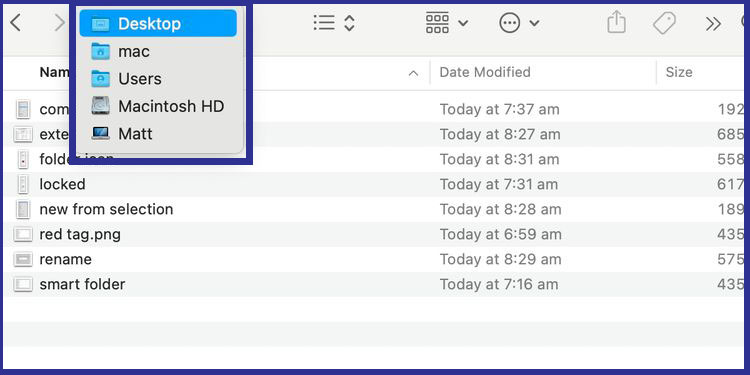
9. Access to the folder structure
To access and view the folder structure in the Finder software, first, click on the name of the current folder in the top toolbar of the program. Then select the folder you want to view. Although this tip seems very simple, it can save the time needed to navigate different routes.
10. Show or hide file extensions
Sometimes it can be useful to display the file extension (format) when renaming. While in certain cases, displaying the extensions is not necessary and only causes the file names to become longer. Fortunately, in the Mac operating system, like Windows, it is possible to show or hide file extensions according to the user’s needs. To access the related configuration, first, refer to the “Preferences” section in the Finder application and then select the “Advanced” option. Then, to show the extensions, tick the option “Show all filename extensions” or if you want the extensions to be hidden, remove the tick.
“The said process will be applicable only for one file, but the method is slightly different. First, click Control “+ on the desired file and then go to the “Get Info” window and tick the “Hide extension” option to hide the extension of the selected file.
Most of Finder’s built-in features are easily accessible to Mac OS users and can have a significant impact on saving time. Of course, there are more sophisticated features in Apple’s file management tool that are not mentioned in this article but can be easily found with a little simple searching on the Internet.
Frequently asked questions about How to organize files on Mac
- What is the best way to organize files on a Mac?
The best way to organize files on a Mac is to create a logical folder structure and use descriptive filenames. You can also use tags to categorize files and make them easier to find.
- How do I create a new folder on a Mac?
To create a new folder on a Mac, right-click on the desktop or in a Finder window and select “New Folder.” You can also use the keyboard shortcut Shift + Command + N.
- Can I change the default download location on a Mac?
Yes, you can change the default download location on a Mac. Go to Safari preferences or the preferences of any other browser you use, and select a new location for downloads.
- How do I move files to a different folder on a Mac?
To move files to a different folder on a Mac, click and drag the files to the desired location. Alternatively, you can right-click on the file and select “Move To” or “Copy To.”
- What are tags, and how do I use them to organize files on a Mac?
Tags are descriptive labels that you can apply to files on a Mac. To add tags to a file, right-click on it and select “Tags.” You can then assign one or more tags to the file. To find files with a particular tag, use the search bar in Finder and type the tag name.
- How do I search for files on a Mac?
To search for files on a Mac, use the search bar in Finder. Type in the name or keyword of the file you are looking for, and Finder will show you all files that match the search criteria.
- What is the best way to back up files on a Mac?
The best way to backup files on a Mac is to use Time Machine, which is a built-in backup feature. You can also use third-party backup solutions like Carbon Copy Cloner or SuperDuper.
- How do I delete files on a Mac?
To delete files on a Mac, select the files you want to delete and press the Delete key. Alternatively, you can right-click on the file and select “Move to Trash.” To permanently delete files, empty the Trash.
- How do I organize photos on a Mac?
To organize photos on a Mac, you can use the Photos app, which allows you to create albums and add tags to photos. You can also organize photos by creating folders and using descriptive filenames.
In this article, we talked about “How to organize files on Mac” and we are waiting for your experiences to use these methods. Please share your thoughts with us.