In 2020, Google introduced a feature to move files more easily, similar to Apple’s AirDrop; But this feature was only available for products made by Google. Now it is finally possible to use Nearby Share in Windows and users can use it to transfer files between their phone and computer.
How to use nearby share in Windows 11
With the help of the “Nearby Share” function of Windows, you will no longer need to connect a “USB” cable to transfer files, and you can easily do this through a wireless network. Of course, Google is not the first company to provide such a feature for use on Windows-based computers, and before that, other options such as Samsung Flow or Shareit were available to those interested.
In order to benefit from the new Google tool in Windows, you must first apply the settings related to it on your Android phone. Then, download and install the application specific to Windows. How to do these things is mentioned step by step in the following article.
Configuring Nearby Share on Android
Before installing the Nearby Share program on Windows, you need to set the required configuration on your Android device. For this purpose, you need to go to the Google Files application. Of course, it is also possible to do this without the mentioned application, both methods are mentioned below.
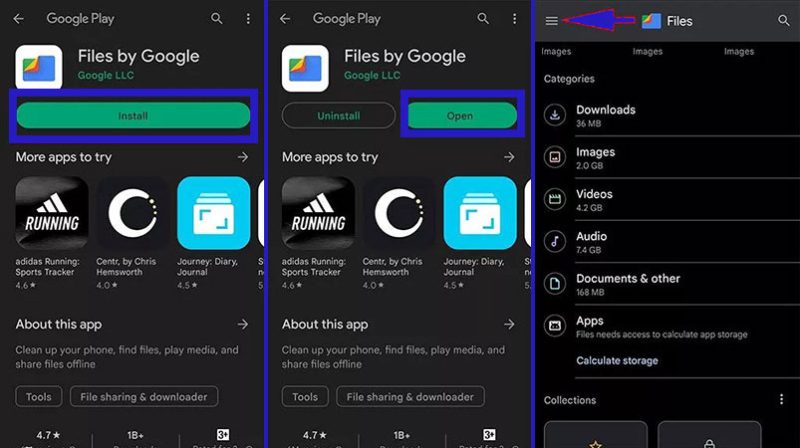
- To get started, go to Google Play and search for “Files by Google“.
- Open the search result similar to the image below and click “Install” to install the application on your phone or tablet.
- After completing the installation process, select “Open” to enter the “Files” program and then click on the hamburger icon in the upper corner of the screen.
- If requested to access the permission to store information and read data from the internal memory, confirm it.
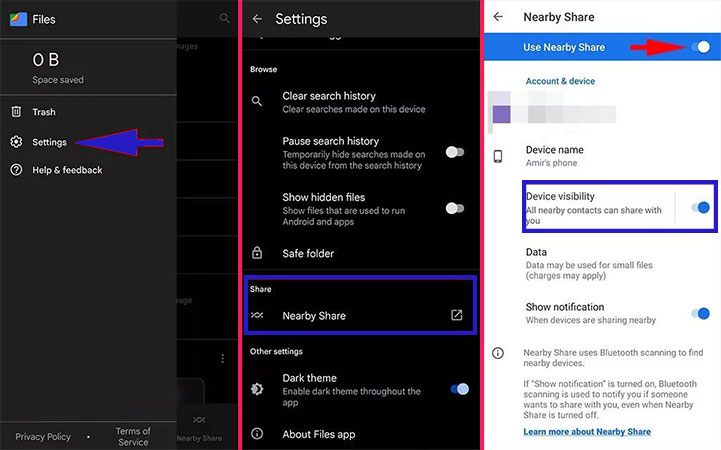
- From the opened menu, select the “Settings” option to enter the application settings page.
- On the Settings page, scroll down to the “Nearby Share” option. Then touch it.
- Now you will be transferred to the “Nearby Share” page, where you have to enable the first option under “Use Nearby Share“.
- Note that the “Device visibility” option is also active.
- If for any reason you don’t want to use the “Files by Google” application, you can go to the settings application of your phone or tablet and then enter the term “Nearby Share” in the search bar.
- Select the first search result displayed and you will be taken to the “Nearby Share” page similar to the image above. Then activate this feature on your device.
Now the steps required to configure the Google file-sharing feature on the Android device are over. In the next step, you should download, install and apply Windows “Nearby Share” settings, which we will discuss further. Also, use the quick access panel (Quick Settings) to disable this mode. If you don’t see the key associated with it, click on the three dots icon, and after selecting the “Button Order” option, add it to the list of keys.
Installing and configuring Nearby Share on Windows
The Windows Nearby Share application is in experimental mode, and therefore it is not yet possible to receive it through the Microsoft Store. Users can use the main Android site to download the program; But due to some restrictions, it is not possible to download it in some countries, including Iran. Fortunately, by receiving the installation file separately, it can be run on the computer, the steps of which are mentioned below.
- Click on this link to download the Windows “Nearby Share” installation file. Then extract the file with the password “digiato”.
- Open the installation file in EXE format and wait until the process of receiving and installing the necessary packages is completed. It is better to set your IP change tool to active mode during this process.
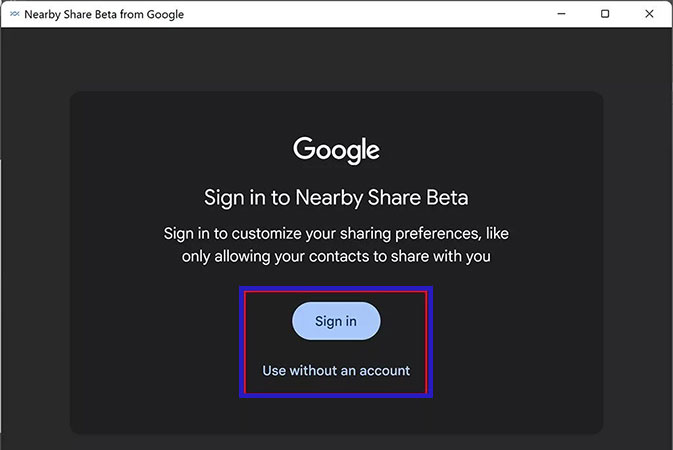
- After going through the previous steps, you will reach the home page of the Windows “Nearby Share” program. On this page, you can enter your Google account by selecting the first option (Sign in).
- In this example, we choose the second option (use without an account); Although it will not make much difference in the output.
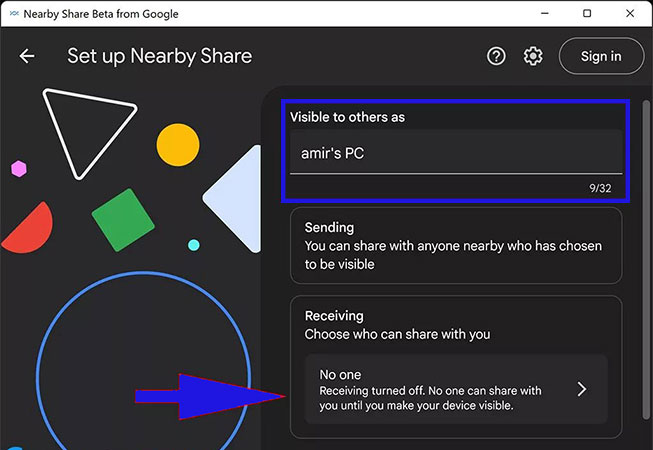
- Now you will be transferred to the “Set up Nearby Share” page, where you can enter the desired name for your computer in the box under the “Visible to the others as” title.
- Note that the “Receiving” field is set to “No one” by default; This means that your computer will not be able to receive files from other devices.
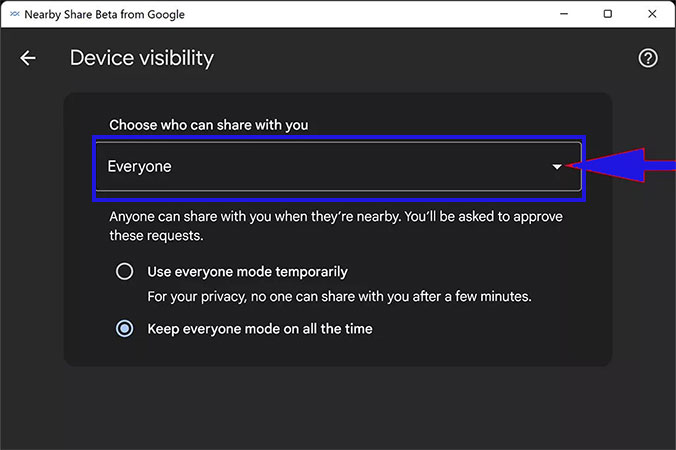
- To correct this, click on the mentioned option to go to the “Device visibility” page. Then open the drop-down menu and choose another option.
- If you are looking for more security, choose the “Contacts” or “Your devices” option; In these cases, respectively, only contacts or devices connected to the Google user account can send files to the computer.
- If you intend to choose the options mentioned above, it is better to log in to your Google account. Also, a notification for authentication may appear on the screen of the phone or tablet in the meantime, which you must confirm.
- If you want to use the Windows “Nearby Share” program without logging into your Google account, click on the “Everyone” option.
- After selecting the “Everyone” mode, two options will be displayed, in the first mode, it will not be possible to share the file after a few minutes; But in the second case, this feature always remains active.
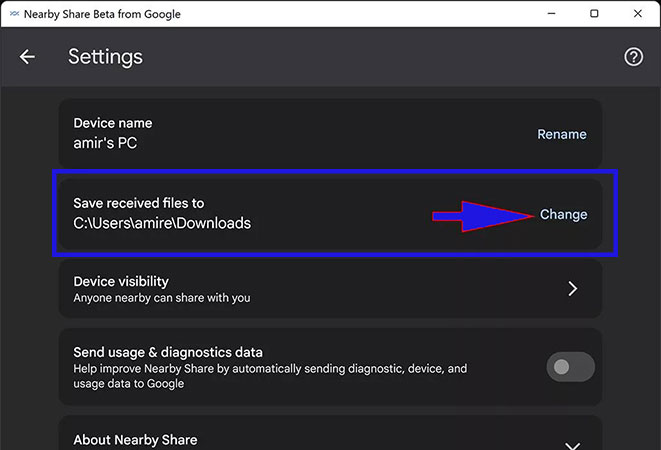
- Next, return to the previous page and click on the gear icon (settings) from the top bar of the window.
- By clicking on the “Change” option in front of the “Saved received files to” phrase, you can change the storage location of the received files to your liking.
- Also, in the future, by visiting this section again, you will be able to change the name of the device and how to receive files.
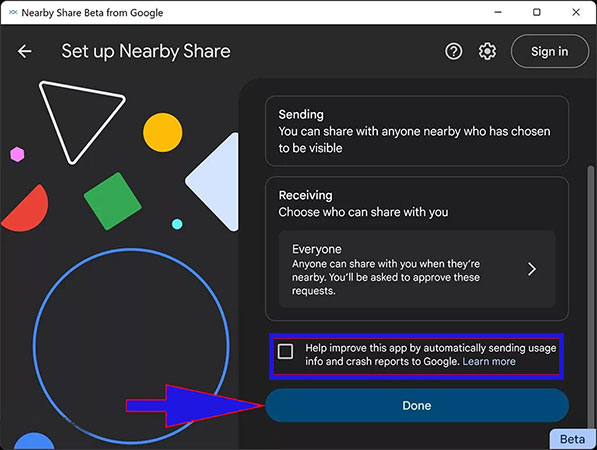
- Finally, return to the “Set up Nearby Share” page and after scrolling down, click on the “Done” button.
- Also, if you are not interested in sending diagnostic data to Google to improve the performance of the software, you can uncheck the option located above the “Done” button.
How to send and receive files on phone and computer
After configuring the Nearby Share software on Windows and phones, it’s time to send or receive files. For this purpose, you can follow the steps below. Note that the received files are saved in the address defined in the settings section, But you can change this default path manually as mentioned in the previous section.
- To send a file from an Android phone to a computer, enter the “Files by Google” application and then go to the location where the desired file is saved.
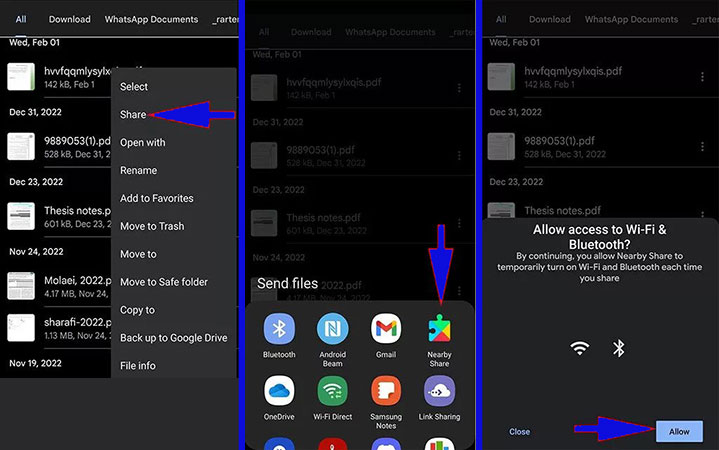
- Click on the three dots icon in front of the file name and then select the “Share” option from the opened menu.
- From the “Send files” menu, click on the “Nearby Share” option. If you don’t see this option, scroll down to open the menu and other options will appear.
- A window will now open informing the user that the file-sharing feature uses Bluetooth and Wi-Fi connectivity. Select “Allow” to confirm.
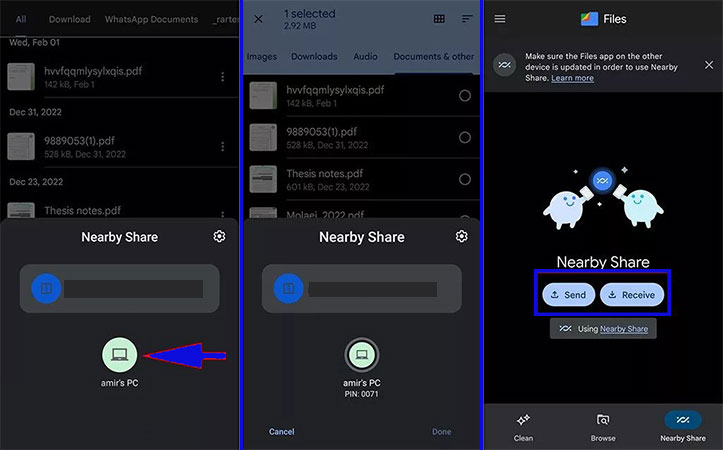
- Wait a while for the devices around you to be scanned. Next, you will see that the name of the computer is displayed in the list of selectable devices. Then click on the name of your desired device to start the transfer process.
- Next, a four-digit PIN will be displayed, and by entering it on the computer, you can confirm the transfer process.
- You will also be able to confirm the process of receiving the file by pressing the “Allow” key on the “Nearby Share” desktop software window.
- If the transfer process is completed correctly, a tick will be displayed next to the name of the selected device and you can view the received file in the computer window.
- In an alternative way, you can directly enter the “Nearby Share” tab after entering the “Files” application, and then select either the “Receive” or “Send” options to send or receive a file.
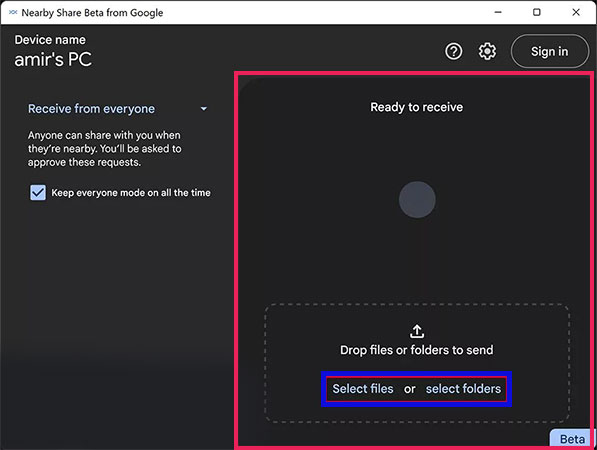
- To send files from the computer to the phone, click on one of the two options “Select files” or “Select folder” in the Windows “Nearby Share” application window.
- Then go to the storage location of the desired file(s) or folder(s) and after selecting it, click on the Open option.You can also drag and drop files or folders (Drag & Drop) to add them to the program.
- Now you will see a notification on your phone or tablet titled “Device nearby is sharing“. Touch it to open the corresponding window.
- Now you can see the name of your phone or tablet in the software window on the computer. Click on it to start the sending process.
Next, you will see a pop-up window to confirm the transfer on the phone screen, which will start the receiving process.
Received files are stored in the internal memory of the Android phone or tablet in the Downloads folder.
Note that when transferring files between a computer and a mobile phone, the devices must be close to each other and have a Bluetooth connection between them. Also, both devices must be connected to a Wi-Fi network or one of them must be connected to another hotspot. It is recommended to disable your IP change tool when transferring files to avoid problems.
Frequently Asked Questions How to use nearby share in Windows 11
- What is Nearby Share in Windows 11?
Nearby Share is a feature in Windows 11 that allows you to quickly and easily share files with nearby devices using Bluetooth or Wi-Fi.
- How do I enable Nearby Share in Windows 11?
To enable Nearby Share in Windows 11, go to Settings > System > Shared Experiences, and then toggle on the Nearby Share option.
- How do I share a file using Nearby Share in Windows 11?
To share a file using Nearby Share in Windows 11, right-click on the file you want to share, select “Share,” and then choose the device you want to share it with from the list of available devices.
- What types of files can I share using Nearby Share in Windows 11?
You can share a variety of file types using Nearby Share in Windows 11, including documents, photos, videos, and more.
- How do I receive a file using Nearby Share in Windows 11?
To receive a file using Nearby Share in Windows 11, simply accept the incoming share notification on your device, and the file will be downloaded to your device.
- How do I change my device name for Nearby Share in Windows 11?
To change your device name for Nearby Share in Windows 11, go to Settings > System > About, and then click on the “Rename this PC” button.
- How do I manage my Nearby Share settings in Windows 11?
To manage your Nearby Share settings in Windows 11, go to Settings > System > Shared experiences, and then click on the “Advanced options” link.
- Can I use Nearby Share to share files with devices that are not running Windows 11?
No, Nearby Share is only available on Windows 11 devices, and you can only share files with other Windows 11 devices.
- How do I troubleshoot issues with Nearby Share in Windows 11?
If you are experiencing issues with Nearby Share in Windows 11, try restarting your device, updating your drivers, or resetting your Nearby Share settings.
- How do I turn off Nearby Share in Windows 11?
To turn off Nearby Share in Windows 11, go to Settings > System > Shared Experiences, and then toggle off the Nearby Share option.
In this article, we talked about “How to use nearby share in Windows 11” and we are waiting for your experiences to use these methods. Please share your thoughts with us.