How to Flash Samsung phones_tricks 2024
Flashing Android devices is one of the common ways to fix software problems that cannot be fixed normally. This process is different in products produced by different manufacturers. In the following, we will discuss how to flash Samsung phones through 3 different methods.
How to Flash Samsung phones
Flash can be used in different concepts; But when we talk about flashing Samsung phones or other Android devices, we mean a specific version of the operating system or backup on the mobile or tablet. To start this process, you need to prepare some prerequisites which are mentioned below.
1. Custom or stock ROM?
Perhaps the most important prerequisite for flashing Samsung phones is ROM, which refers to the installable version of Android on a particular device. Usually, two types of custom and stock ROMs are used by users, each of which has its own advantages and disadvantages.

- Stock ROMs are usually developed by the smartphone manufacturer or carrier and are more stable. Also, the possibility of bugs and software problems in these ROMs is less. But pre-installed applications and adware on them can be annoying for some users.
- Custom ROMs are mostly developed by Android enthusiasts and provide users with more features in the field of personalizing the operating system. In these ROMs, there are no annoying adware and default applications, and some of them are able to consume less battery. But the possibility of bugs and software errors in such ROMs is that they have less stability compared to stock ROMs.
2. Data backup
While flashing Samsung phones or other devices, all user data will be deleted from the internal memory. So, before starting work, it is better to make a backup copy of all your essential information such as contacts, messages, call history, photos, videos, and other files.

Various programs have been released to make a complete backup of device information, the most popular of which is “Titanium Backup“. Such apps need root access to provide all their features, But they are able to make backup copies of various things such as programs. Using cloud services such as Google Drive and Google account can be useful to save some different items of contacts.
3. Fully charge the device
Another important prerequisite for flashing Android devices is to fully charge the battery; Because if the phone or tablet is turned off during the process, it may be irreparably damaged and made completely unusable. It is usually recommended that the charge of the device should be more than 40% when starting flashing; But to make it easier for you, let it reach 100%.
4. Download and install the required drivers
Regardless of which of the following methods you want to use, you must download the drivers for your phone or tablet first and then install them on the computer. Without these drivers, the computer will not be able to recognize the device properly and you will face problems.
- You can use the link below to download Android drivers from its official website.
https://developer.android.com/studio/run/win-usb
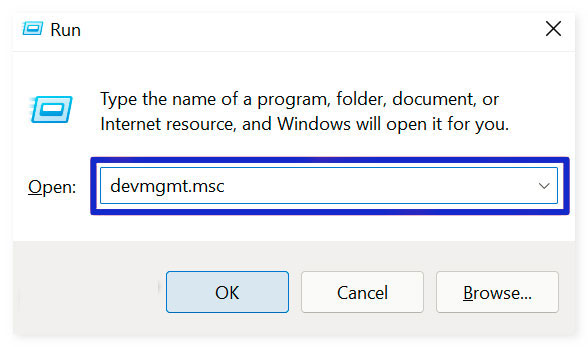
- After downloading the zip file, extract it in a folder and then press the combination key “Win + R” in the Windows environment to run the “Run” tool. You can also find this tool by searching for “Run” in the start menu. Next, enter the following command in the specified box and press the “Enter” key or the “OK” key.
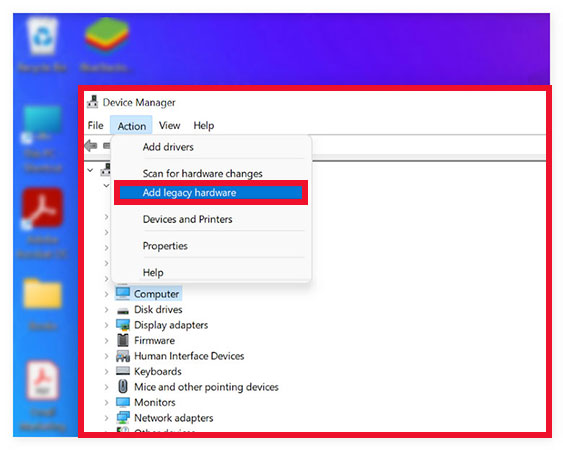
- Now click on the “Computer” option as shown below and then click on the “Action” tab in the upper corner of the window. Then select the “Add legacy Hardware” option from the action menu.
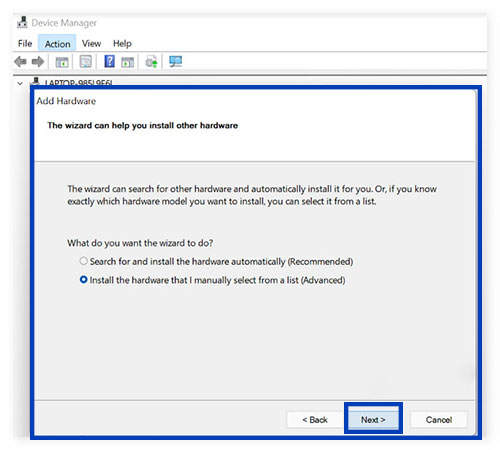
- Click “Next” in the new window. Then select the “Install the hardware that I manually select from a list” option and click “Next” again. Next, select “Show All Devices” and click “Next” again.
- Now it’s time to select the downloaded file. To do this, first, select the option “Have Disk” and then go to the location of the extracted file in the inf format that you downloaded at the beginning. Finally, click “Next” once more and wait for the driver installation process to finish.
5. Download Samsung ROM
After going through the above steps to install the driver, you can start the process of flashing the device. But you should note that you will also need a ROM to install on your phone or tablet. Various sites offer stock or custom ROMs for free, an example of which is mentioned below.
https://firmwarefile.com/
How to flash Samsung phones with SP Flash Tool
There is various software available to users to flash Samsung phones, one of which is called “SP Flash Tool“. To flash the device with the help of the mentioned software, it is enough to go through the following steps.
- Download the software “SP Flash Tool” from the link below and then “Extract” it in a separate folder.
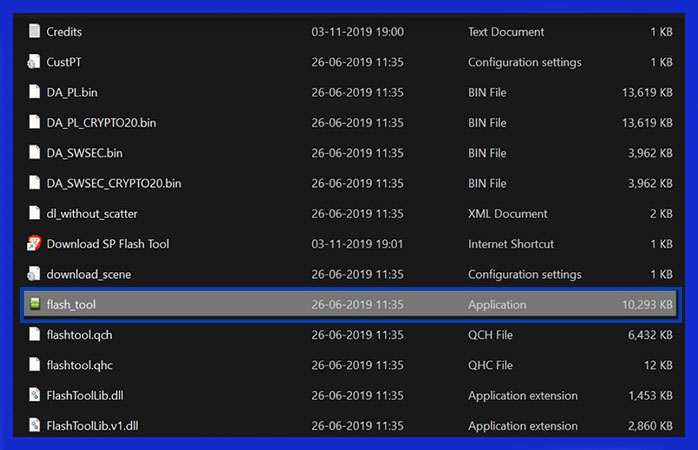
- Open the folder where you extracted the zip file and then select the “Flash_Tool.exe” file as shown in the image below and right-click on it. Select the “Run as administrator” option from the opened menu.
- Next, the window related to the “Smart Phone Flash Tool” software will open. In this window, click on the option “Choose” in front of the word “Scatter-loading file” and then select the file “Android_scatter.txt” from the same folder as before.
- Then select “Download Only” from the drop-down menu under “Authentication File“.
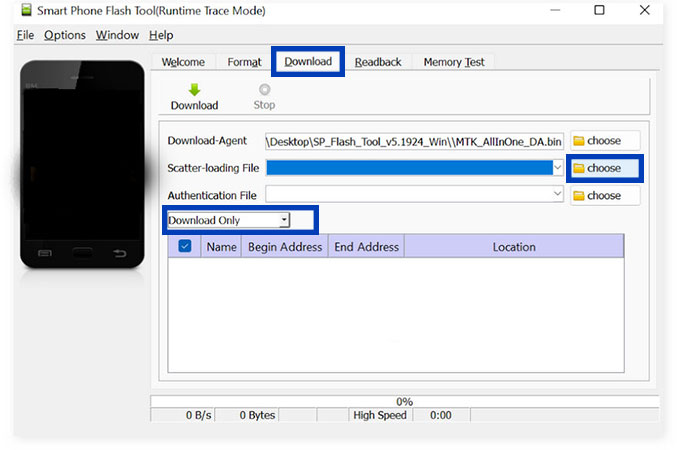
- Finally, click on the “Download” button below the word “Welcome“.
- After the download process is complete, connect your phone to the computer via a cable. Note that the device must be turned off before connecting. A little later, the flashing process will begin. If a green tick is displayed in the “SP Flash Tool” window, it means the device has been successfully flashed. At this stage, you can disconnect the device from the computer and turn it on.
How to flash Samsung phones with DroidKit
DroidKit software is another option for reinstalling or updating the operating system of Android devices, and it can be used to flash Samsung phones. This program does not need a pre-downloaded ROM and can automatically receive the official ROM suitable for the device.
- To get started, go to the URL below and download the DroidKit software for your operating system. Currently, Mac and Windows versions are available to users.
https://imobie.com/go/download.php?product=dk
- After receiving the software and installing it on your computer, log in and then select “Reinstall/Upgrade OS“.
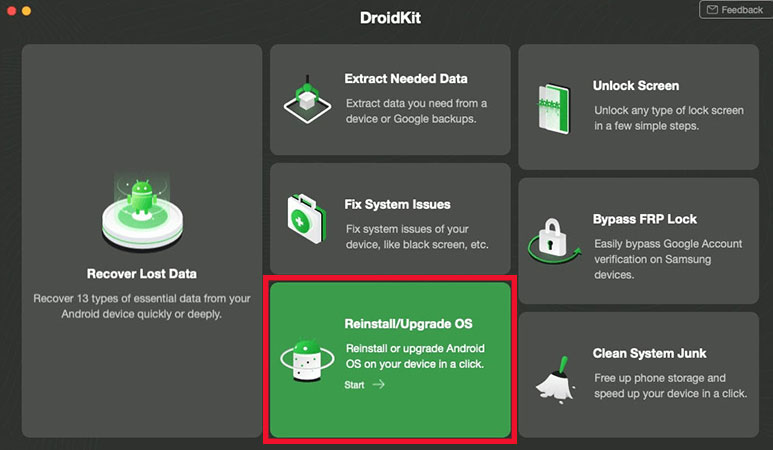
- Now it’s time to connect your Samsung phone or tablet to the computer via USB cable. After connecting the device, click on the “Start” button in the middle of the screen.
- If you have correctly identified the device, you can see its name on the next page. Click “Next” to continue.
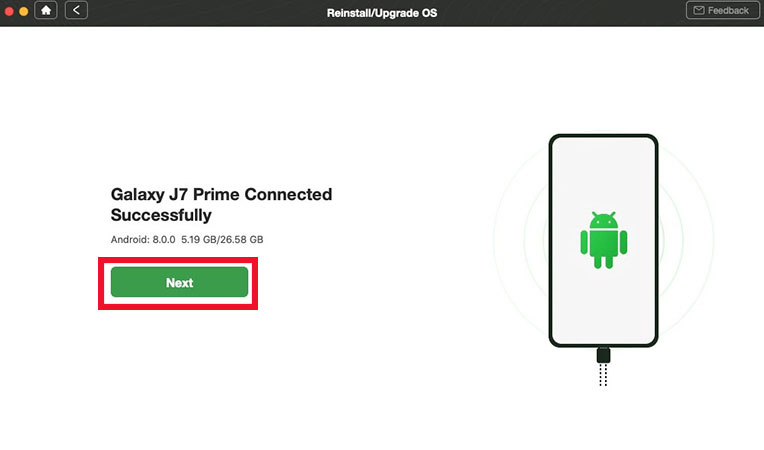
- In the following, you can view and select the appropriate ROMs for your device to download. To do this, all you have to do is click on the “Download” option under the word “Operation” for each option.
- After the ROM download process is complete, click on the “Start to Upgrade” button at the bottom of the page.
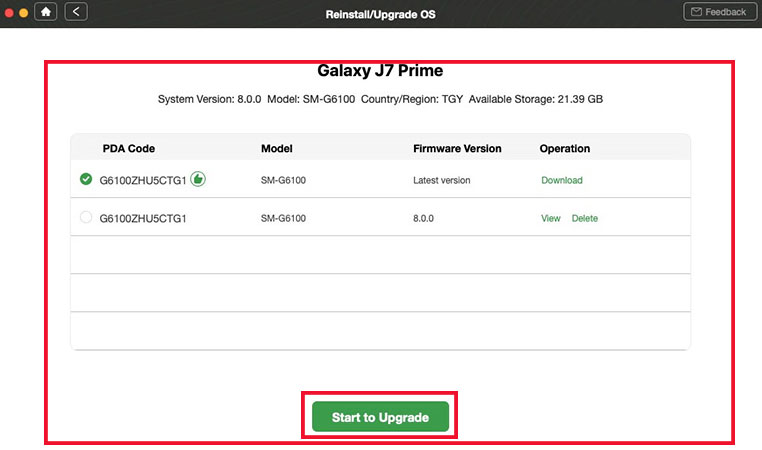
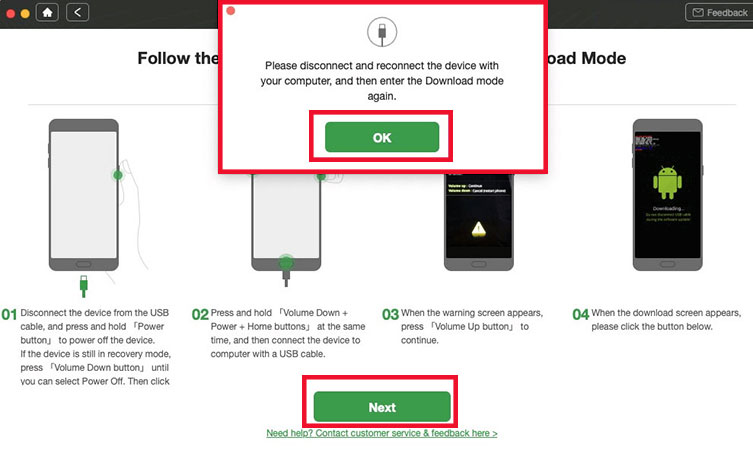
- Now you need to put your device in Download Mode. How to do this is fully explained in the corresponding window; But in summary, after disconnecting the cable from the device, you must hold the power and volume down and the home keys at the same time, and after displaying the warning message, press the volume up key. After the download page is displayed, connect the device to the cable again and click the “Next” button in the software window on the computer.
- Now you only need to wait until the phone flashing process is finished. After that, you can disconnect the device from the cable and turn it on.
How to flash Samsung phones with Odin (recommended)
Odin software is among the most popular flash tools for Samsung devices. Although this program does not allow users to download ROM automatically, it has good stability and can be used in different situations. If you intend to flash your Samsung phone with Odin, it is better to download the ROM suitable for your device and the required drivers using the method we explained in the previous sections.
- First, download the Odin software from the link below.
https://odindownload.com/
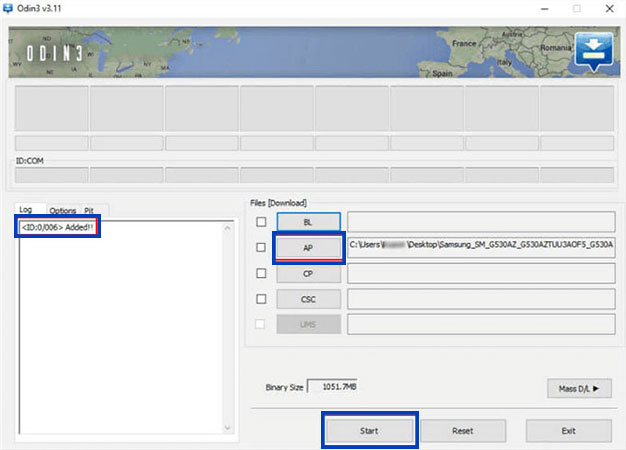
- Now connect your device to the computer through the “USB” cable and run the Odin software. Wait for a little until Odin automatically detects the device and the “Added” message is displayed on the left panel of its window.
- After the device is successfully recognized by Odin, click on the AP key as shown in the image below. In some versions, this key may appear as a “PDA“. Next, go to the storage path of the “md5” file corresponding to the desired ROM and select it. Finally, press the “Start” button at the bottom of the screen.
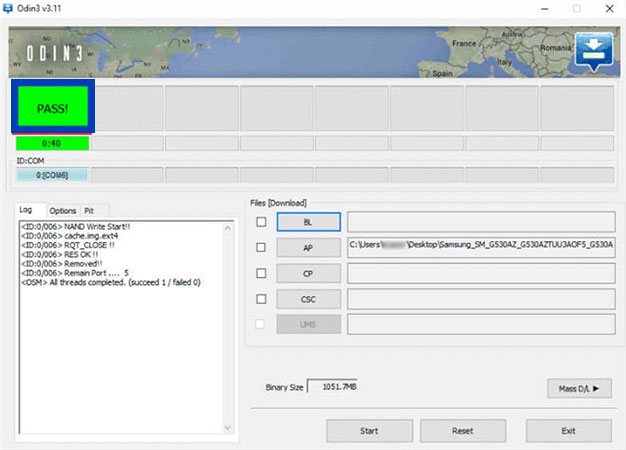
- Wait for a while until the process of installing the new ROM is finished. If the ROM is installed correctly, you can see a green “Pass” message similar to the image below in the Odin software window. At this stage, disconnect your device from the cable and wait for it to restart.
Frequently asked questions about flashing a Samsung phone
- What does flashing Samsung phones mean?
Flashing Android devices, including Samsung products, means installing a new operating system on the phone or tablet or reinstalling the previous operating system to fix problems or add new features.
- Will flashing Samsung phones cause any problems?
In general, the process of flashing Samsung phones will not cause any special problems; But you must pay attention to follow the steps carefully, otherwise, you can face many problems such as device failure.
- Does flashing Samsung phones delete device data?
Yes; During the process of flashing Samsung phones, all user data including images, photos, contacts, messages, call history, and files on the internal memory are deleted.
- What is the best way to flash Samsung phones?
Various software for flashing Samsung phones are available to users, But one of their most popular titles is the Odin app.
In this article, we talked about “How to Flash Samsung phones” and we are waiting for your experiences to use these methods. Please share your thoughts with us.

