New features and capabilities always encourage users to get the latest version of their operating system. But sometimes using the final versions can cause the device to malfunction. In such a situation, if you are using Apple computers, luckily you will have three methods to downgrade MacOS so that you can restore the proper functioning of your laptop or computer.
How to downgrade Mac os
Usually, Apple includes attractive features in new versions of its operating system, some of which can be very useful. However, if you cannot use the mentioned facilities well and you face problems in other areas, you will have no choice but to downgrade to MacOS. Of course, the said process will not be so simple and will have its own complications.
Apple has always tried to release Mac OS updates with backward compatibility; But still, in some cases, due to hardware problems and lack of correct compatibility with the software, we see faulty performance after updating the operating system. This issue is more visible in audio, video, and graphic hardware facilities and affects related applications. For this reason, many developers of said products advise users to avoid updating MacOS (or other operating systems) before the end of the projects.
It is strongly recommended to make a backup copy of the essential data on your device’s internal memory before starting the MacOS downgrade process; Because in all the mentioned methods, there will be a possibility of complete deletion of information from the memory of the laptop or computer. Users can make backup copies using the built-in “Time Machine” function. Of course, note that one of the methods of downgrading the operating system is through old versions of Time Machine; in this case, it is better to choose only the necessary personal information so that the downgrading process does not face problems.
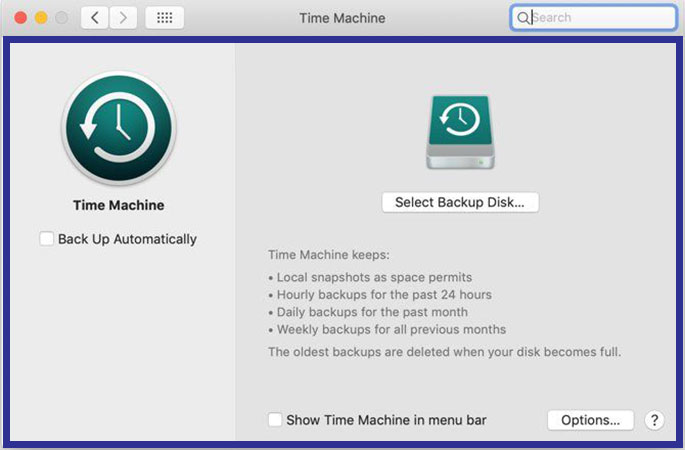
Although Time Machine is a very useful tool for making backup copies on MacOS, some key features such as cloning drives are not seen in it. For this reason, some users prefer to use other software such as SuperDuper and IDrive, which are available for free.
How to Downgrade Mac OS with Recovery Tool
If your Mac came with an older version of Apple’s operating system, downgrading it is very easy and hassle-free. To do this, it is enough to use the macOS Recovery tool, which is considered by default by Apple. Before starting work, make sure that your device has a stable connection to the Internet, and then the process of downloading the older version will be done automatically.
Note that this method only applies to Mac products based on Intel processors and cannot be used on newer devices that use Apple’s proprietary chips such as the M1. For downgrading new Macs, it is better to use the other two methods mentioned below.
The downgrading process by MacOS recovery tool is very similar to reinstalling the operating system; But instead of getting the new version, you have to download the old version that the device originally came with. If it’s been many years since your computer was introduced, it’s likely that the oldest version of MacOS available is downloaded. Continuing this path will delete the data from the internal memory of the device, so it is better to make a backup before starting.
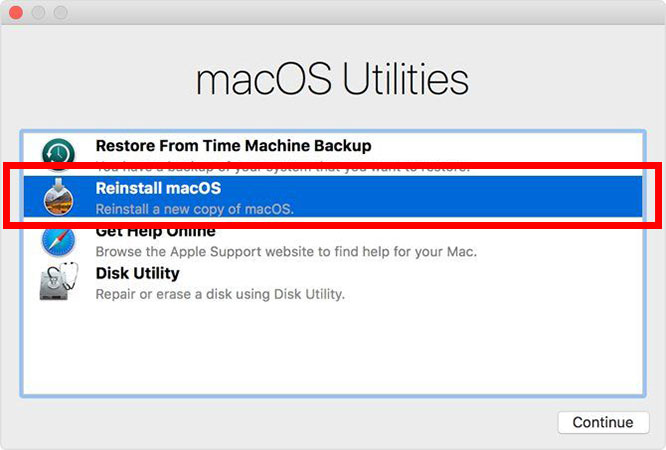
First, turn off your device. Now turn on the device again and immediately press and hold the key combination “Shift + Option + Cmd + R“. You will notice that the time required to turn it on will be a little longer than usual; Because MacOS Recovery Tool is loading. After you see the “macOS Utilities” page, select “Reinstall macOS” (or Reinstall OS X) and then click “Continue“.
Follow the displayed instructions and then select the desired startup disk. Next, click on the “Install” button and follow the written instructions to complete the rest of the installation process. After completing the steps, you can restore your files from the backup.
How to Downgrade Mac Using Backup
Using a Time Machine backup is another easy and simple way to roll back to older versions of the operating system. Of course, to take advantage of the said mode, you must have made a version in Time Machine in the past, otherwise, it is not possible to downgrade.
To start the downgrade process with the backup copy, first, connect the Time Machine memory to your device and then turn it off or restart it. Next, you need to boot your Mac in recovery mode. To do this on products based on Intel processors, press and hold the combination key “Cmd + R” to enter “Recovery Mode“. On newer devices that use M1 chips, press and hold the power button after turning it on until you see the words “Loading Startup Options” on the screen. On the next page, you will be able to select “Recovery mode” from the “Options” menu.
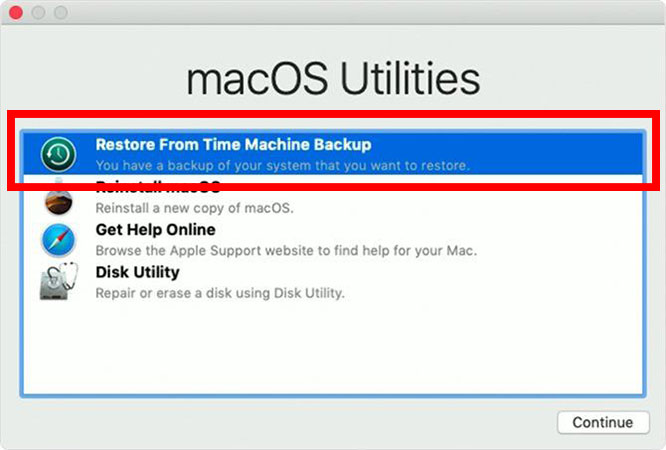
After displaying the “macOS Utilities” page, select the “Restore From Time Machine Backup” option and click the “Continue” button. On the next page, select “Continue” again. Now select the memory address used to store the backup copy in the “Restore Source” menu. Next, click on the desired file so that you can see the MacOS version associated with it. By following the displayed instructions, you will be able to complete the process of reinstalling the operating system from the backup. Finally, restore your previous files.
How to downgrade a Mac with the old version installer
Before the release of MacOS Mojave by Apple, users had the possibility to download older versions of the operating system directly from the App Store. With the update of the App Store from Apple, the mentioned feature was also unavailable; But you can still download them through a dedicated page on Apple’s support website. The installation tool is downloaded through the “Software Update” section in the “System Preferences” section and will be visible in the “Applications” folder after the complete download.
After you have downloaded the installer file for the MacOS version you want, you can use it to create a bootable disk that can be used to reinstall the operating system. This method will be useful for users who are planning to go back from MacOS Monterey to older versions such as Big Sur on devices based on the M1 chip; Because in these products, using the recovery method will install the latest version of the operating system.
Remember that older versions of MacOS become more difficult to download over time; As a result, it is better to prepare a support version of the installer file before updating your system to a newer version. You will need a USB flash drive with a minimum volume of 16 GB to continue. You can also use an external hard drive.
External memory preparation
Before you can create a macOS installation tool on a USB flash drive or external hard drive, you need to format it first. If you have already formatted the memory, you can skip this section and continue with the steps. To start the process, enter the “Disk Utility” application after connecting the memory to the device. By pressing the combination key “Cmd + Space” and opening the spotlight, you can find the said program or go to the “Applications” folder in the Finder and then select the “Utilities” menu and double-click on the title of the program.
Under the “Format” heading, select either “+HFS” or “APFS“. “APFS” is Apple’s more modern file system standard, first released in 2017 for iOS devices. It also has experimental support on MacOS because it was considered. Since the Sierra releases, bootable SSDs have been changed to APFS during installation, and with the release of Mojave, Fusion Drives and HDDs have also been included. As a result, the appropriate standard is chosen according to the version of the operating system required for installation.
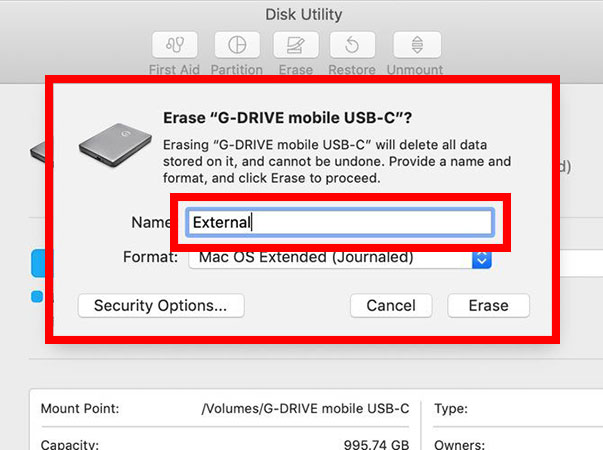
After choosing the appropriate standard, press the “Erase” key and then click “Done” to complete the memory format process.
Create installer
To make a bootable installer, first, connect your formatted memory to the device and then run the Terminal application. The commands required to be used inside the terminal will be different in different versions of MacOS. If you want to create an installation for Big Sur Drive, use the following command; Otherwise, you should replace “Big Sur” with the name of the version you are using (eg Mojave).
sudo /Applications/Install\ macOS\ Big\ Sur.app/Contents/Resources/createinstallmedia --volume /Volumes/Untitled
Use the installation tool
Now we managed to put the installer on the flash drive and we can downgrade the operating system. First, turn off the device and then connect the memory with an older version of MacOS to it. Boot the Mac into recovery mode as described in previous sections for products based on Intel processors and Apple M1 chips. After the “macOS Utilities” page appears, click on “Disk Utility“.
Now, in the “Startup Disk” section, select the installation location of the operating system and then click the “Erase” option. Select one of the two system formats “HFS+” or “APFS” according to the version in use. Restart the device again and this time press and hold the “Option” key (on Intel systems) or do the same with the power key (on M1 systems). Now the “Startup Manager” screen will appear where you can select the USB flash drive or external hard drive used to install the operating system. Use the cursor keys to move between different options and finally press the “Return” key.

After loading the macOS installation tool, click the “Install macOS” button. After completing the installation process, you will be able to restore your files from the backup.
If you’re thinking of downgrading your Mac for various reasons, including slowing down and poor performance, you’d better think a little more about this decision. Although your problem will be solved eventually, the downgrading process is not so easy on some devices; Especially if you haven’t backed up in the past. Deleting additional and temporary files in the internal memory along with reducing the number of default applications at system startup can help increase the speed of the device.
Frequently asked questions about How to Downgrade Mac os
- Can I downgrade my Mac OS to any previous version?
No, you can only downgrade to a previous version of the Mac OS that was available on your device before the current version.
- What are the steps to downgrade my Mac OS?
First, you need to back up all your important data, then create a bootable USB installer for the older version of macOS you want to install. After that, you need to erase your Mac’s hard drive and install the older version of macOS using the bootable USB installer.
- Will downgrading my Mac OS erase all my data?
Yes, downgrading your Mac OS requires erasing your hard drive, which means you’ll lose all your data unless you have a backup.
- Is it possible to downgrade without erasing my hard drive?
No, downgrading requires erasing your hard drive, but you can back up your data and then restore it after the downgrade.
- Can I downgrade from macOS Big Sur to an older version?
Yes, you can downgrade from macOS Big Sur to an older version of macOS that was available on your device before the current version.
- Can I downgrade my Mac OS without a backup?
It’s highly recommended to back up your data before downgrading your Mac OS. If you don’t back up your data and something goes wrong during the downgrade process, you could lose all your data.
- What if I don’t have a bootable USB installer for the older version of macOS I want to install?
You can download the older version of macOS from the Mac App Store, create a bootable USB installer using a third-party tool, or contact Apple support for assistance.
- Can I upgrade my Mac OS after downgrading?
Yes, you can upgrade your Mac OS again after downgrading, but make sure to check the system requirements for the new version of macOS before upgrading.
In this article, we talked about “How to Downgrade Mac os” and we are waiting for your experiences to use these methods. Please share your thoughts with us.